ICEdit AI
Transform your images with simple text instructions. State-of-the-art AI editing that requires no design skills.
What is ICEdit AI?
ICEdit (In-Context Edit) is an innovative framework for instruction-based image editing that transforms how we modify images using natural language commands. This efficient solution allows users to edit images by simply describing what changes they want in plain English.
Natural Language Processing
Edit images using simple text commands
Lightning Fast
Process images in just 9 seconds
State-of-the-art Results
Superior quality with minimal resources

Overview of ICEdit
| Feature | Description |
|---|---|
| AI Tool | ICEdit AI |
| ICEdit | In-Context image editing |
| Research Paper | https://arxiv.org/pdf/2504.20690 |
| GitHub | https://github.com/River-Zhang/ICEdit |
| Model | https://huggingface.co/sanaka87/ICEdit-MoE-LoRA/tree/main |
| Huggingface Demo | https://huggingface.co/spaces/RiverZ/ICEdit |
Key Features of ICEdit
Efficient Image Editing
Achieves state-of-the-art results with only 0.5% of the training data and 1% of the parameters required by prior methods.
Instruction-Based Editing
Enables robust image modification via natural language prompts, ensuring high precision and efficiency.
In-Context Generation
Leverages large-scale Diffusion Transformer for enhanced generation capacity and native contextual awareness.
Hybrid Tuning Strategy
Combines LoRA and MoE for efficient adaptation and dynamic expert routing, ensuring flexibility without extensive retraining.
Early Filter Inference-Time Scaling
Uses vision-language models to select better initial noise early, improving edit quality.
Open-Source and Cost-Effective
Offers a more open-source approach with lower costs, faster processing speed (9 seconds per image), and powerful performance.
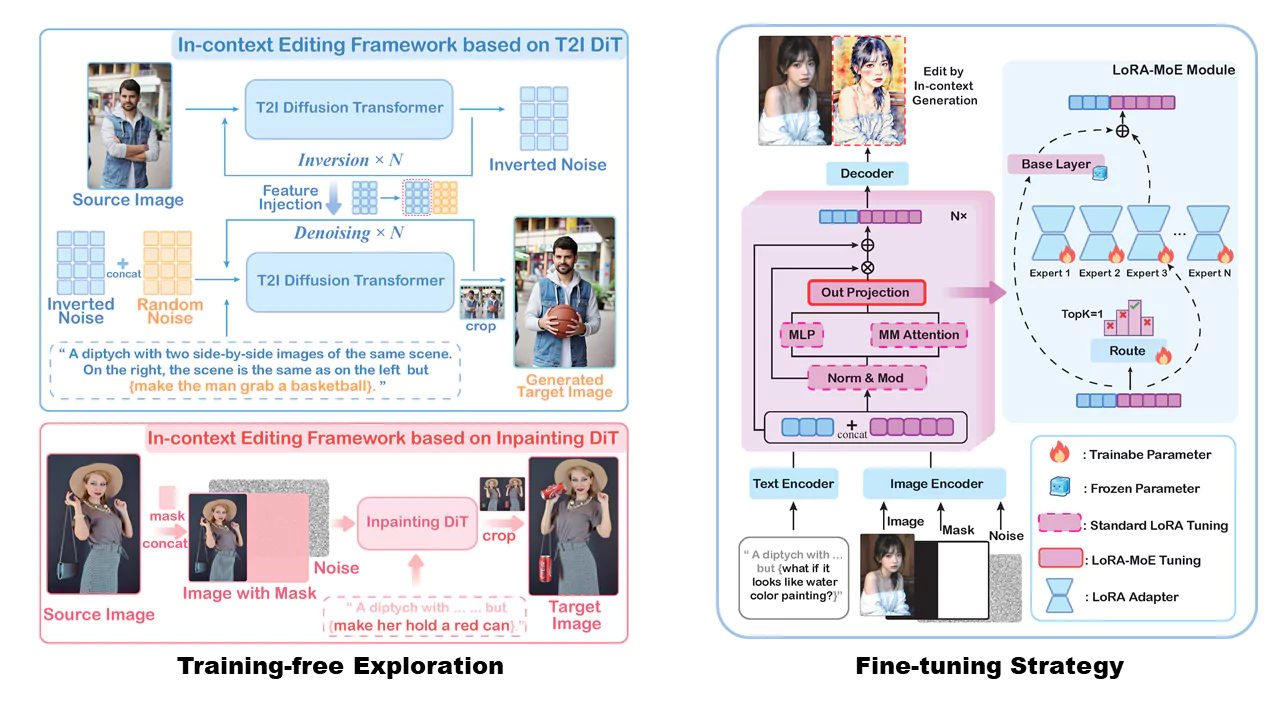
How ICEdit Works
ICEdit leverages large-scale Diffusion Transformer (DiT) technology with three key innovations:
In-Context Editing Framework
Uses in-context prompting to understand and apply edits without requiring structural changes to the model.
LoRA-MoE Hybrid Tuning
Combines LoRA (Low-Rank Adaptation) with Mixture-of-Experts routing to enable flexible and efficient adaptation.
Inference-Time Scaling
Employs vision-language models to select better initial noise patterns, significantly improving edit quality.
ICEdit represents a significant advancement in making sophisticated image editing accessible to everyone, regardless of their technical expertise in graphic design or image manipulation.
ICEdit Demo


Demo images generated by ICEdit
ICEdit AI Installation in Local
Conda Environment Setup
conda create -n icedit python=3.10
conda activate icedit
pip install -r requirements.txt
pip install -U huggingface_hub
Download Pretrained Weights
If you can connect to Huggingface, you don't need to download the weights manually. Otherwise, download the following weights to your local machine:
Inference in Bash (w/o VLM Inference-time Scaling)
Now you can have a try!
Note: Our model can only edit images with a width of 512 pixels (no restriction on height). If you pass in an image with a different width, the model will automatically resize it to 512 pixels.
If the model fails to generate the expected results, try changing the --seed parameter. Inference-time Scaling with VLM can also help improve results.
python scripts/inference.py --image assets/girl.png \
                            --instruction "Make her hair dark green and her clothes checked." \
                            --seed 42
Gradio Demo
We provide a Gradio demo for a more user-friendly image editing experience. Run the following command to start the demo:
python scripts/gradio_demo.py --port 7860
Comparison with Commercial Models
ICEdit (Open Source)
- ✓Instruction-based text editing
- ✓~9s per image processing
- ✓0.5% training data, efficient
- ✓Runs locally; customizable
Commercial Editor A
- ✓Good quality image edits
- ✓Cloud-only, pay-per-use
- ✓Limited customization
- ✓Proprietary models
Commercial Editor B
- ✓User-friendly UI
- ✓Subscription pricing
- ✓Slower bulk processing
- ✓Vendor lock-in
ICEdit focuses on transparent, reproducible research with strong performance and low cost, while many commercial tools trade flexibility for convenience.
Pros and Cons
Pros
- ✓State-of-the-art editing
- ✓Efficient training data
- ✓Fast image processing
- ✓Open-source framework
- ✓High precision editing
Cons
- !Persistent failure cases
- !Requires fine-tuning
- !Data limitations exist
How to Use ICEdit on Huggingface
ICEdit makes image editing as simple as writing a sentence. With this powerful AI tool, you can transform your photos in seconds without any design skills. Here's how to get started:
Step 1: Visit the ICEdit Space
Head over to ICEdit on Huggingface. The interface is clean and straightforward, designed with beginners in mind.
Step 2: Upload Your Image
Click the "Upload image for editing" button on the left side of the screen. Select any photo you'd like to modify from your device.
Step 3: Describe Your Edit
In the text box at the bottom of the screen, type in what you want to change about your image. Be specific but keep it simple! For example:
- Change the sunglasses to a Christmas hat
- Make the background blue
- Add flowers to the scene
Step 4: Click "Run"
Hit the "Run" button and wait just a few seconds. ICEdit typically processes images in about 9 seconds - much faster than many other AI image editors.
Step 5: View Your Result
Your edited image will appear on the right side of the screen. If you're happy with it, you can download it using the download button in the top right corner.